

This is tested only to work on Linux.
Step 1: Set Up Keyhouse
- Create your organization’s Keyhouse repository:
Step 2: Set Up Watchdog for Access Syncing and Logging
Watchdog talks to Keyhouse directly (via thewatchdog_utils_II crate) to keep your server’s users and groups in sync. There’s no separate webhook server to run.
- Create a Slack app (api.slack.com/quickstart)
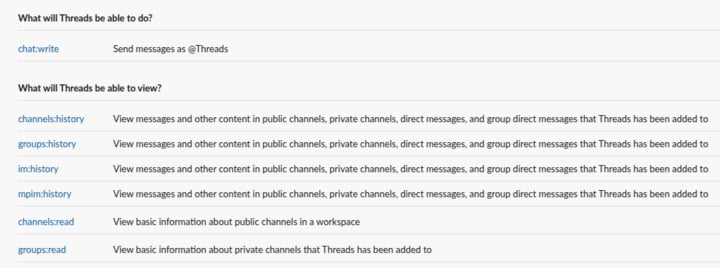
#watchdog.
- Clone Watchdog and build:
Whether you need the
--features auto-update flag here depends on which
sync method you pick below. See Keeping Watchdog in Sync with
Keyhouse.- Update the
config.tomlaccording to the providedsample.config.toml.
hostname: this server’s name as it appears in Keyhouse access lines. A member withratchet|studyin their hosts file gets access to the server whosehostnameisratchet.[keyhouse]: the API URL of your Keyhouse repository and a GitHub token that can read it.[notifiers]: the Slack bot token and the ID of the channel to post to.create_user_dir: whentrue, Watchdog also creates a home directory for each user under/opt/watchdog/users/<user>, and archives it when the user is removed. Linux accounts are created and deleted either way. Defaults tofalse.
- Run the install script:
- Copy the binary to
/opt/watchdog/bin/watchdogand your config to/opt/watchdog/config.toml - Point sshd’s
AuthorizedKeysCommandat Watchdog, so SSH keys are checked against Keyhouse - Add PAM hooks for
ssh,sudo, andsu, which report activity to Slack
install.sh (without manual-) only does the sshd and PAM steps. It’s
meant for the .deb package, which puts the binary and sample config in
place itself.watchdog on your PATH:
- Run an initial full sync, so the server has users and groups provisioned before you pick an ongoing sync method:
Watchdog adds users to groups but doesn’t create the groups themselves.
Create a group on the server for every project that appears in Keyhouse
(see the Server Admin Guide). The one exception is
sudo, which maps to the server’s sudo or wheel group.Keeping Watchdog in Sync with Keyhouse
Once Keyhouse has your initial access rules, something needs to keep telling Watchdog when those rules change. There are three ways to do that. Pick one (or combine them: for example, CI for near-instant sync plus a daily cronwatchdog update --all as a safety net).
Option A: CI (fully automated, recommended)
This is the closest thing to instant sync: a GitHub Actions workflow, running on a self-hosted runner on the server itself, executessudo watchdog update the moment your Keyhouse repository finishes building. No polling delay, no login required to trigger it.
You do not need the
auto-update build feature for this option. Build
Watchdog normally (cargo build --release).-
Register this server as a self-hosted runner for your Keyhouse repository:
- In your Keyhouse repo on GitHub, go to Settings → Actions → Runners → New self-hosted runner.
-
Pick Linux, and copy the
downloadandconfigcommands GitHub shows you. They look like this (use the exact ones GitHub gives you, since the version and token are unique to your repo): -
Install and start it as a service, so it survives reboots and keeps listening for jobs:
-
Add a workflow to your Keyhouse repository that runs on this runner whenever a build completes. Create
.github/workflows/scout.ymlin your Keyhouse repo:"Build and Deploy"here must match the name of the workflow in your Keyhouse repo that builds and pushes to thebuildbranch (Keyhouse’s own template ships one by this name; check your repo’s.github/workflows/main.yamlif you’ve renamed it). The runner’s user must be able to run this command withsudowithout a password. For example, if the runner runs asrunner, add this withsudo visudo -f /etc/sudoers.d/watchdog-runner: -
Commit and push this workflow file to your Keyhouse repo’s default branch. From now on, every successful Keyhouse build will trigger
watchdog updateon this server automatically.
A self-hosted runner executes whatever a workflow in that repository tells
it to, with the permissions of the user it runs as (here, enough to run
sudo watchdog update). Only register runners against repositories you
trust and control access to. This is safe for a private, admin-gated
Keyhouse repo, but is not something you’d want on a repo that accepts
contributions from untrusted forks.Option B: auto-update build feature
Build Watchdog with the feature flag:
Option C: Manual / cron watchdog update
Run this whenever you want to pull the latest Keyhouse state:
/etc/cron.d/watchdog with: